≡ Menu

I visited Glacier National Park from July 8-15, 2023 and I wanted to share some notes on how to get the best out of visiting this very beautiful national park. I had a tremendous time; this was the best national park trip I’ve ever been on, but there are challenges that have to be navigated that I imagine did not exist in earlier decades.

Background – I am an amateur photographer of many decades and an intermediate day-hiker. I like beautiful vistas and good light. While at Glacier, I hiked the Highline (to Granite Park Chalet and back), Grinnell Glacier, Iceberg Lake, and Avalanche Lake. I kayaked Lake McDonald in a light rain. I took about 2500 photos of sunrises, sunsets, glorious sunny days, and moody cloudy ones. Mountains, wildflowers, animals, lakes, streams, waterfalls, forests, and glaciers.

The Challenges (in approximate importance, high to low):

  1. Snow
  2. Smoke
  3. Crowds and construction
  4. Animals
  5. Rain
  6. Borders

Challenge 1: Snow

Glacier National Park is located in northwestern Montana, up high in the Rocky Mountains and abutting the Canadian border. As such, it takes a long time for the winter snow to melt and/or be cleared away, meaning that the park has a very short season compared to other national parks; even though the weather may be great, your access to certain locations may be significantly restricted until the snow is cleared off the roads. May to September is the summer season and the peak is in July and August. Not everything will be open and easily accessible until about July 1, give or take a few weeks depending on the year. And things start to shut down in mid-September. This is not to say that you can’t visit outside this season, but you will be limited as to what you can do.

The primary road crossing Glacier NP is the Going-To-The-Sun Road. The GTTSR is noted for being one of the most scenic drives in the country, with dramatic vistas of the surrounding mountains, lakes, and forests. Some people come to the park just for this 50 mile, approximately 2 hour drive (Google Maps) across the Continental Divide. The GTTSR is one of the big factors in park access as Logan Pass, at 6,646 feet of elevation, is the starting point for many popular hikes (Highline, Hidden Lake, Garden Wall). As Logan Pass is also the highest point on the GTTSR, it is the last portion of the road to be cleared of winter snow. The National Park Service has a page with the historical opening and closing dates of the GTTSR at Logan Pass; as you can see, since 2000, this has been as early as May 27 and as late as July 13. At a glance, the trend seems to be towards later opening dates. By the way, the GTTSR is not the only way to get from one side of the park to the other; you can take US Highway 2 around the south end of the park.

For current road conditions, see this NPS page.

Challenge 2: Smoke

Increasing temperatures and decades of questionable forest management policies have made summer wildfires a fact of life in western North America. And even if the immediate area isn’t on fire, the smoke can carry a long way, reducing visibility and endangering your health. You’re there to see the natural wonders of the park and it sucks if that’s veiled in smoke; worse if you can’t breathe without damaging your lungs.

During my week-long trip, the smoke from the wildfires in British Columbia impacted the park for the last few days. These are dynamic situations, depending on the winds and the status of the fires, with conditions changing from day to day. It also doesn’t necessarily affect the entire park at the same time. The mountains can block the smoke to some extent, which can mean one side is clearer than the other.

NOAA’s High Resolution Rapid Refresh (HRRR) service has two nice data products to show the smoke density on maps:

  1. An interactive map with animated time-lapse – turn on the HRRR/Near Surface Smoke layer
  2. Static maps with hourly forecasts about 6 hours into the future – select from the Near-Surface Smoke row

fire.airnow.gov shows the air quality measurement stations; as of July 2023, there are about 7 stations in and around the park reporting PM2.5 levels. Turn on the Smoke Plume Extent layer to see a coarse representation of the smoke coverage.

Challenge 3: Crowds

Vehicle Reservations

National Parks are continually increasing in popularity, with visitor number trending upwards, especially post-pandemic. The popular parks, including Glacier, have implemented various strategies to limit crowds. In the case of Glacier, vehicle access during peak season requires a vehicle reservation. These reservations cover specific areas of the park: Going-To-The-Sun Road, Many Glacier, North Fork, and Two Medicine. Each reservation gives you access to that specific zone. The Going-To-The-Sun Road reservations are good for three consecutive days, while the other zone reservations are for one day. For the GTTSR, it is not required to “activate” a reservation; you can use the reservation on any of the days you have a reservation for.

Reservations are released 4 months in advance, with some held back and released 1 day prior at 8am MDT. They are managed by Recreation.gov. In my experience, in early July 2023, about 900 passes were made available for the GTTSR each day and they were taken in about 5 minutes. People have said that as long as you are on the website exactly at 8:00am MDT and have a good Internet connection, you should be able to get one. Also ensure you set up and sign into your Recreation.gov account prior to 8am. This is complicated if you are in/around the park, where Internet access, whether via cellular data or WiFi, is extremely spotty to mostly non-existent.

In addition, I’ve heard that after the 8:00a release, a smaller batch is released about 10-15 minutes later. I suspect that these are reservations that are initially grabbed, but aren’t actually purchased and they are released when their carts time out. Since the majority of folks have given up and left, these go slower.

Here is the NPS page about vehicle reservations.

There are two (and a half) workarounds if you don’t have a vehicle reservation:

  1. Get there early or late. Vehicle reservations are not required before 6am or after 3pm. This is my preferred strategy whether I have a vehicle reservation or not, especially if I’m heading to a popular trailhead. Also, as a photographer, the light is much better at sunrise anyways.
  2. The corollary to the above point: stay in the park once you get in. Vehicle reservations are only checked at the entry checkpoints. Once you’re in, there are no other checks. Regardless of how you got in, whether you had a reservation or just showed up early, you’re good until you leave the zone.
  3. Get a service reservation. You don’t need a separate vehicle reservation if you have a reservation for that day for a recognized service inside the zone you’re going to, whether that’s a hotel/chalet/campground, boat ride, bicycle/kayak rental, or horseback ride. See the FAQ questions at the bottom of this NPS page for a list of recognized lodging and services. Some people have gone as far as to make and pay for reservations that they don’t actually use. And no, renting bear spray does not count as a valid service reservation for these purposes.

Parking and crowded trails

Parking inside the park is very limited, especially at the popular trailheads. At the top of the list is Logan Pass, which is where many popular trails, like the Highline and Hidden Lake, start. The solution is the same as above – get there early or late. Late can be problematic as you’re up against sunset, but if you’re not embarking on a long hike, that can be ok. Also consider that bears are more active at sunrise and sunset.

The Logan Pass parking lot fills up fast, like 7am fast. Again, you want to get there either early or late. I was at the West Glacier entrance gate at 5:30a in order to reach Logan Pass by 6:30a.

In general, if you do find parking in the park, it’s best to not try to move around. Go more in-depth at a spot, pick longer or multiple hikes, or use the park shuttles to get around. Attempting to find a parking spot midday is not going to go well. It’s fine if you’re just tooling around the GTTSR and stopping at random turnouts (a nice thing to do at sunset), but the main trailheads are very difficult to find parking at.

If you have to arrive at midday, you can park at Apgar Visitor Center, where there is lots of parking, and use the shuttles to get around the park.

As far as trail crowding goes, well, again, go early or late.

Construction

Roads in the park have to be constantly maintained, especially as the snow and rain can take a severe toll on them. Currently there is a 9 mile stretch of road by Lake McDonald that is under construction. There are varying delays, day or night, depending on the construction progress. This can cause delays of up to 30 minutes. Sundays are typically better as they don’t work on that day.

Best thing to do is to keep an eye on the NPS road conditions page and plan accordingly. Also, don’t rush on these roads! I’ve seen a number of vehicles with flat tires either due to the rough dirt roads or sharp rocks. You don’t want to spend your vacation waiting for a tow truck!

Challenge 4: Animals

There is a good amount of wildlife in the park, including bears, moose, mountain goats, and marmots. For your safety and the safety of the animals, you must give them a wide berth! Bears, moose, and goats can easily outrun you and kill you! See this NPS safety page for more information.

For bears, you must carry bear spray in the park. This is basically a form of pepper spray formulated to deter a bear from continuing it’s attack. Be aware that you cannot bring bear spray on an airplane in any way (carry-on or checked)! If you are flying in, you must rent or purchase bear spray locally. If flying into Kalispell (FCA/GPI), Glacier Outfitters rents bear spray at their shop by baggage claim and you can return there when you leave. Some hotels/Airbnbs make bear spray available to their guests, especially as other guests purchase bear sprays and leave them behind; contact them for more information.

Give bears and goats a wide berth! If there is a bear, go the other way! Don’t run though, as that can trigger a chase instinct. Moose and goats can charge and kill you – those horns are not for decoration! Go around or back the way you came if they are blocking your path. This is by no means a complete summary of how to be safe around animals in the park.

Challenge 5: Rain

During the summer, it is very common to see afternoon thunderstorms. Because of the geographical nature of the Continental Divide which runs through the park, the Divide is where warm, moist air from the Pacific meets cold, dry air from the Arctic. Also, the aforementioned Divide also means that the weather on the west side of the park can be very different that the weather on the east side.

These thunderstorms can dump a lot of water on you for an hour or two. Be sure you carry some form of rain gear and keep an eye on the weather forecast! And be sure you review the NPS page on lightning safety!

The upside for photographers is that the clouds tend to move fairly quickly and can generate dynamic lighting that changes from moment to moment. Early mornings tend to be calm, with winds picking up after that.

Challenge 6: Borders

Did you know there is more to the park in Canada? Glacier National Park abuts the Canadian border and north of it is Waterton Lakes National Park. You may note the NPS map you get at the Glacier entrance gate is titled Waterton-Glacier International Peace Park World Heritage Site. Each country administers the part of park on its side of the border, but they coordinate. Waterton Lakes is in Alberta and is about 11% the land area of the combined park. Lots of nice scenery up there, including a bison paddock where you drive a one-way loop, a la Jurassic Park, and you can see some bison grazing. There was a wildfire in 2017 that burned 40% of the park, which makes for some dramatic scenes of forests of burnt tree trunks among fields of mountain wildflowers.

From St. Mary on the east side of the park, it is about an hour’s drive across the border to the Waterton Lakes Visitor Centre. There are lots of nice restaurants and shops at the visitor center as there’s a small tourist town there. Unlike the NPS, which tends to just pick a handful of concessionaires, the Canadians seem to allow for a wider diversity of businesses. Go try a BeaverTail!

If you do want to visit, you’ll need your passport! There is a border crossing for the park, Chief Mountain Port of Entry. Be sure you know the opening hours for the border; they vary depending on the time of year and are completely closed during the winter. You don’t want to get stuck on one side of the border! Canadian Border Services page, US CBP page. Also, note that in summer of 2023, the highway on the US side of the border (MT-17) was not in great shape in places.

If you show up at the border around lunchtime (when they are scheduled to be opened), you may find the booths unmanned and the lanes coned off. Just wait and someone will show up. Going north, you will show your passport to the Canadian authorities and going south, the US.

Waterton requires a separate entry fee (CAD$10.50 for an adult, CAD$21 for a group/family); the America the Beautiful pass and other US passes don’t work, because, well, it’s not America. They take credit cards, as does everything I saw in the visitor center, so you don’t need to worry about getting Canadian currency, though it would be useful to have a card that doesn’t charge foreign transaction fees. Also, be sure your cell phone plan covers international roaming if you want to use your phone in Canada.

{ 0 comments }

Braised Daikon with Minced Pork

This is a simple, weeknight dish combining garlicky pork with luscious braised daikon with a nicely mild radish bite and sweetness. This is modified from a Japanese recipe, swapping dashi, sake, and mirin for oyster sauce and some chicken stock – things which are in my more Chinese pantry. I also drop the ginger for green onion, but mostly because I don’t use a lot of ginger.

If you omit the optional rice, this is pretty low in carbs as daikon is not a particularly high starch vegetable.


Braised Daikon with Minced Pork

Developed by The RoboGourmet – v1.0, 1/24/2022
Adapted from RecipeTin Japan

Serves 2

Pork
0.5 lb ground or minced pork
1 tablespoon light soy sauce
1 tablespoon minced ginger
Extra light olive oil or vegetable oil

Daikon
1 lb daikon, ends trimmed, peeled,  and roll-cut into 1 ¼” chunks*
A handful of rice (optional)
1 green onion, thinly sliced with the greens and whites separated
2 tablespoons dark soy sauce
1 tablespoon oyster sauce
1 ¼ cup chicken stock or low sodium broth, divided
½ teaspoon corn starch

*Note: When preparing the daikon, if it is quite thick (2.5” or more), cut it lengthwise into 4 strips before roll-cutting into chunks.

Marinate the pork: In a small bowl, mix the ground pork with the light soy sauce. Ensure the soy sauce is evenly combined with the pork. Set aside to marinate.

Parcook the daikon: Put the daikon and rice (if using) in a small pot and add water to cover the daikon. Bring to a boil and cook for 10 minutes, or until the daikon is nearly cooked through (a bamboo skewer or fork should pass through). Drain, rinse with cold water and drain well. Set aside.

Cook the pork: Add 1 tablespoon of oil to a 12” skillet and heat on medium-high until starting to smoke. Add the minced garlic and let cook until aromatic, about 30 seconds. Add the pork and break up with a wooden spatula into small pieces. Let cook on one side, then stir to cook the other side.

Braise the daikon: Add the parcooked daikon to the pan with the pork. Add the white part of the sliced green onion, 1 cup of the chicken stock, the dark soy sauce, and the oyster sauce. Stir to combine. Bring to a boil, then cover and simmer on low for 10 minutes.

Thicken the sauce: In a small bowl, mix the cornstarch and remaining chicken stock well to make a smooth slurry. Add the slurry to the pan and stir to combine. Let cook for a minute to thicken the sauce. Take off heat, garnish with the remaining sliced green onion and serve.

Download PDF

{ 0 comments }

Jeep Grand Cherokee Stalling and Won’t Start

I have a 2000 Jeep Grand Cherokee (WJ) and while it’s given me relatively few problems over it’s 20 year lifespan (<180K miles), recently it developed a problem where after about 15-30 minutes of driving, it would stall when coming to a stop, all the gauges would go dark, and then it would not start when cranked. If you left it for 15-30 minutes it would start again, but would stall again after some time.

Annoyingly, no DTC codes were logged, which made it difficult for my mechanic to diagnose, and their test drives failed to trigger the problem. I think if I’d had a scan tool available when the stalling occurred, the problem would have thrown a code.

In the end, it turned out to be a failing auto shut down (ASD) relay. I believe that its failure mode was to stop working when it gets hot, causing the engine to shut down.

Update 2021-01-19

My Jeep stalled again, this time while decelerating in a section of sluggish traffic on a freeway. I managed to have enough momentum to get her over to the shoulder, and as before, she started up after sitting for 15 minutes.

Took her to a different mechanic who replaced the fuel pump and fuel regulator. So far so good – one interesting thing is that previously I had seen an intermittent coolant low warning that would quickly flash on the overhead display, even though the coolant level was fine. That seems to have gone away after this fuel pump replacement.

Update 2022-01-25

I think we’ve reached a conclusion in this saga. The final fix in the end was to replace the ECU. My Jeep has not stalled in the 6 months since the fix.

{ 0 comments }

Bell Striker Jamming Carriage on an Olympia SM9

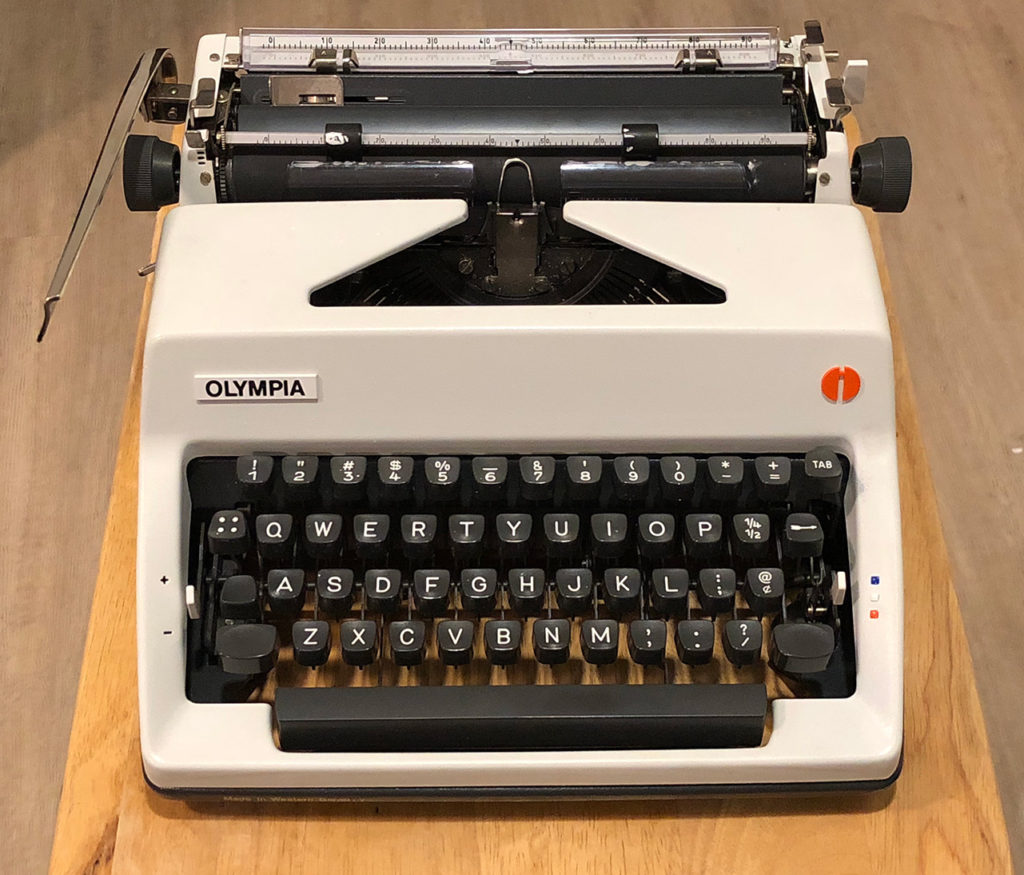
Olympia SM9 portable typewriter

I recently purchased a 1978 Olympia SM9 portable typewriter, and though by 1978 the quality of Olympia typewriters had started to decline, in the opinion of some, I still expected a solid, reliable, German typewriter. When I started typing on this typer, everything seemed to work fine, but occasionally the carriage would jam towards the end of a line, before the right margin stop. The type would still hit the page, but all in the same spot, as the carriage would not move. Hitting the margin release and wiggling the carriage would free it, but there was no guarantee as to whether I could reach the end of the next line without jamming again.

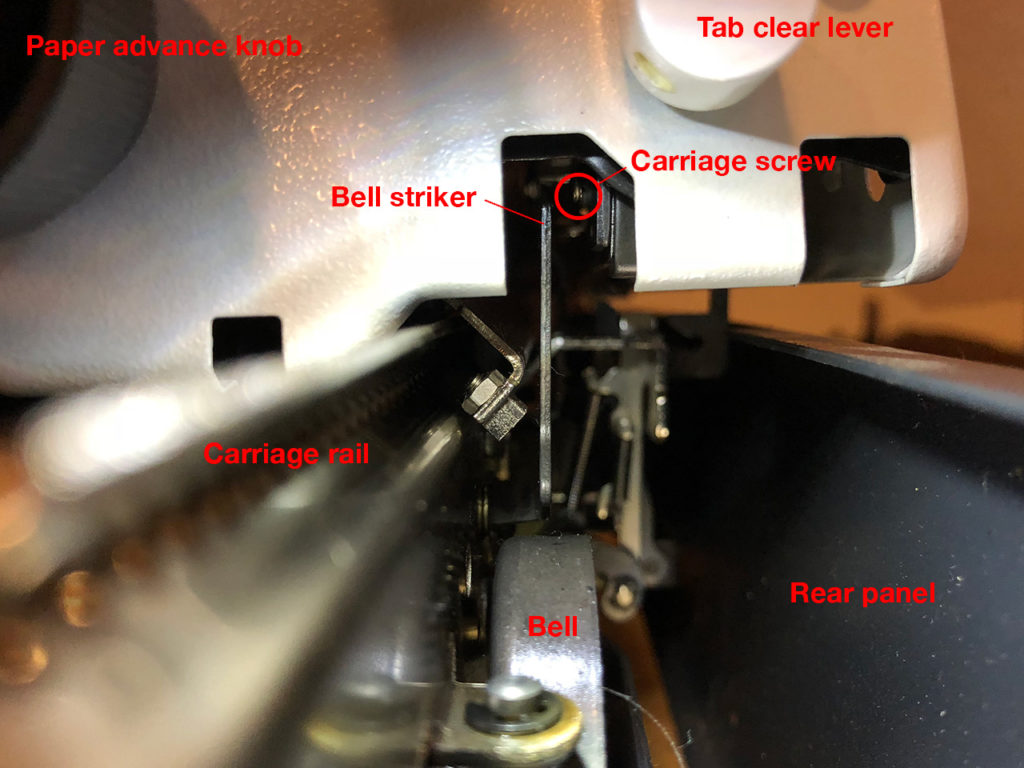
This was a bit worrying, as jamming carriages can be a symptom of serious mechanical problems in a typewriter. Still, this typer appeared to be in great shape, and appeared to have been professionally serviced sometime. I ran a few more test lines to see if I could identify the problem; I noticed that the jamming seemed to occur right after the bell was struck, and sure enough, on the next jam, I could see that the striker was getting caught on a carriage screwhead. Somehow, the striker was leaning too far backwards and occasionally it would catch on this screwhead on the carriage and cause it to jam. Gently bending the striker forward so it stood straight up-and-down fixed the problem and all was well. Well, now I just need to clean the type and fix the return spring on the margin release.

Looking down the carriage rail from the right side. The bell striker (center), if leaning too far backwards, will catch on the carriage screw, causing it to jam.

{ 0 comments }

Moving to Virginia with a Car

As with my previous article on moving to Washington DC with a car, here are my notes on moving to Virginia with a car. Virginia actually requires more stuff than DC, annoyingly.

I moved to northern Virginia, specifically Arlington, and my impression is that the police around here are also very interested in making sure you register you car within 30 days. They also have patrols to look for out-of-state vehicles.

If your car was purchased within the last 12 months, you’ll need to pay a one-time Virginia sales/use tax (something like 4.05%). Also, in many localities (cities/counties), you need to pay Personal Property Tax annually that’s based on the value of the car; I paid $33 for a 15 year old car.

Driver’s License, Title, and Registration
If you line up all your ducks in a row, you can take care of driver’s license, title, and registration all in one trip to the DMV. There’s a separate thing for paying Personal Property Tax and getting a parking permit (optional), but that’s locality (city/county) based and can be done online.

Vehicle Insurance
You need to have Virginia vehicle insurance. I just called my previous company and they set me up. Don’t forget to cancel your old policy when your new policy goes into effect! They should refund you for any premium payments you made for the portion of the policy after your cancellation date.

Vehicle Inspection
In Virginia there are two inspections you need to have done:

  1. An emissions inspection every two years is required for registration in the counties of Arlington, Fairfax, Loudoun, Prince William, or Stafford, or in the cities of Alexandria, Fairfax, Falls Church, Manassas, or Manassas Park. If you were inspected within the last twelve months and have the certificate from one of the following states: Arizona, California, Colorado, Connecticut, District of Columbia, Georgia, Illinois, Indiana, Maryland, Massachusetts, Missouri, New Jersey, New York, North Carolina, Ohio, Oregon, Pennsylvania, Tennessee, Texas, Utah, Washington, Wisconsin, you don’t need to be inspected for a year.
  2. An annual safety inspection is required by the state police; you get a decal that goes on the middle of the bottom of your windshield. If you fail, you get a rejection sticker and have to get the problems resolved and reinspected with 15 days.

Unlike DC, the inspection facilities are not run by the government and are typically privately run garages. I did the Yelp thing and looked for a place with good reviews. I ended up with Community Car Care in Alexandria, which is decent.

When you pass emissions, you get a print-out/certificate of your test results. Keep this – the DMV gets it electronically, but it helps to have it in case something goes wrong. And your next state might accept it.

Documents
For your driver’s license, there’s a whole laundry list of things you need:

  1. Proof of Identity (2 required) – typically a passport, birth certificate, and/or out-of-state ID.
  2. Proof of Virginia Residency – Lease was fastest for me. Renter’ insurance, utility bills and bank statements are acceptable as well. They, of course, have to reflect your Virginia address.
  3. Proof of Legal Presence – typically the same documents as proof of identity, but has to show you have a legal right to be in the US.
  4. Proof of Social Security Number – typically your Social Security Card
  5. Proof of driving ability – your previous license
  6. Driver’s license application

The Virginia DMV also has a Document Guide page to help ensure you have all the right documents.

For title and registration, you need to have:

  1. The title from your previous state or registration card from your previous state. Virginia DMV will give you a VA title. Don’t lose this! You’ll need it the next time you move!
  2. Proof of address – same as the proof of Virginia residency you used for your driver’s license.
  3. Proof of purchase price – only needed if you purchased your car in the last 12 months. This is to collect sales tax on your car. Otherwise, you’ll be asked to sign a statement that you purchased your car over a year ago.
  4. Inspection certificate – needed if you’re using your out-of-state inspection that was done within the last 12 months. I lost mine, so I had to go get an inspection done. The DMV will temporarily register your car for 30 days while you get that done, and then you need to reregister. Fortunately, this can be done online.
  5. Application for Title and Registration – new titles/new tags. Select how many years you want to register your car (one or two). It will ask if you want an electronically recorded title. This is good if you plan to stay in Virginia long term, but if you expect you might be moving, get a paper title so you don’t have to request one when you move.

I don’t believe that they asked for proof of vehicle insurance when I was at the DMV, but you are required to have it and on the registration form you do have to certify that you have sufficient insurance.

Going to the DMV
There are a number of DMV offices. Go early, before opening if possible and preferable on a weekday. Also note that while most offices are open on Saturday, they’re only open from 8am to noon. The initial line is for the information desk, where they will give you a number based on what services you need. They will also check to see if you have the right paperwork. Then there’s a waiting room where you wait until your number is called. You will be instructed to go to a specific counter. They accept cash, check, money order, or major debit/credit card.

Personal Property Tax and Parking Permit
As I mentioned above, many localities require you to pay personal property tax on your car annually. Many of them, like Arlington, handle this online. You get a decal that goes on your windshield that local police look for. They also handle parking permits, if required in your area and you have to park on the street.

{ 0 comments }

Moving to Washington D.C. with a Car

A few notes on moving to the District (DC) with a car. DC, I presume due to the high rate of transiency, is really strict about having people register their car within 30 days. The have ROSA (Registration of Out of State Automobiles) teams that go out at night, particularly Sunday night, to look for cars that are parked in DC consistently over a 30 day period. If you really do live outside DC, you can file for a ROSA exemption. However, this article assumes you are moving to DC.

Parking
In the short term, you probably need a place to park your car. If you don’t have off-street parking where you live, you’ll have the joy of finding a spot on the street. Depending on where you live, this can be challenging. Much of DC is covered by Residential Permit Parking (RPP), which allows residents to purchase a parking permit which allows them to park in a particular zone. Here’s the map, with zones from 1-8. You can ignore the letters after the zone. Important to note that people without permits typically can only park for two hours per zone per day. It doesn’t matter if you move your car. As long as it’s in the same zone, you have a max of two hours total per day. The exceptions are metered spots (as long as you pay), the few spaces that don’t require a permit (some blocks), and after hours (weekends, holidays, and after 8:30pm until 7am the next morning).

You can only get a RPP if your car is registered in DC, for $35 per year (in 2015). What is useful to note is that you can get a visitor parking permit good for up to 15 days from the local police station if you have proof of DC residency, such as a lease. If you’re temporarily staying with someone in DC, they can get a visitor parking permit for you.

Another note about parking – street sweeping. Most streets are swept twice, once on each side, typically on different days. There are signs posted indicating the day of the week and the time window for sweeping; your car must not be parked there during those hours! Parking enforcement shows up in force to ticket violators! Street sweeping is suspended during the winter and holidays, so you don’t have to worry about it then, but don’t get caught when they start up again in the spring!

And another gotcha is Temporary No Parking signs. Residents can get Temporary No Parking signs for things like moving and special events from the city. They have to be put up 24 hours in advance for metered spaces and 72 hours in advance for non-metered spaces. This means that you need to check on your car at least every 3 days to ensure someone hasn’t posted a No Parking/Reserved sign.

Driver’s License, Title, Registration, and Parking Permit 
If you line up all your ducks in a row, you can take care of driver’s license, title, registration, and parking permit all in one trip to the DMV.

Vehicle Insurance
You need to have DC vehicle insurance. I just called my previous company and they set me up. Don’t forget to cancel your old policy when your new policy goes into effect! They should refund you for any premium payments you made for the portion of the policy after your cancellation date.

Vehicle Inspection
You have to take your car to the DC inspection station to have it checked for safety and emissions. It’s good for two years. There is one Vehicle Inspection Station for the city, located in southwest DC. They’re pretty fast, with inspections taking 10-15 minutes, but the lines do get long. I recommend going early on a weekday; it’s best if you can get there before they open. There will be a line of cars waiting. Appointments are possible as well, but those get scheduled further out.

Assuming you pass, you’ll get an inspection sticker on your windshield and a print-out/certificate of your test results. Keep this – the DMV gets it electronically, but it helps to have it in case something goes wrong. Also, there’s also a chance you might move to Virginia or Maryland and I know at least Virginia will honor a DC inspection, as long as it’s within a year and you have the certificate.

Documents
For your driver’s license, there’s a whole laundry list of things you need:

  1. Proof of Identity – typically a passport, birth certificate, or state ID that meets REAL ID standards (star on your drivers license).
  2. Proof of DC Residency (2 required) – Lease and renter’s insurance was fastest for me. Utility bills and bank statements are acceptable as well. They, of course, have to reflect your DC address.
  3. Proof of Social Security Number – typically your Social Security Card
  4. Proof of driving ability – your previous license
  5. Driver’s license application

For title and registration, you need to have:

  1. The title from your previous state. DC DMV will give you a DC title. Don’t lose this! You’ll need it the next time you move! If there is a lien on your car, you have to submit a request for title.
  2. DC driver’s license – the DMV processes the driver’s license first so you have this
  3. Proof of valid odometer statement – your inspection certificate covers this
  4. Proof of vehicle insurance in DC – from your insurance company; the thing you typically keep in the car.
  5. Inspection certificate
  6. Certificate of Title/Registration and Tag application form – new titles/new tags. Select how many years you want to register you car (one or two) and if you want a parking permit.

The DC DMV also has a Document Verification Guide page to help ensure you have all the right documents.

Going to the DMV
There are a number of DMV offices. Go early, before opening if possible. The initial line is for the information desk, where they will give you a number based on what services you need. They will also check to see if you have the right paperwork. Then there’s a waiting room where you wait until your number is called. You will be instructed to go to a specific counter. They accept cash, check, money order, or credit card (VISA or MasterCard only).

{ 2 comments }

Communicating with I2C devices with the LinkM


I was recently looking for a USB to I2C adapter and mostly I found rather expensive ($100-300) development kits which tend to be large-ish boards. Considering I2C communication can be done with a fairly basic microcontroller, I thought these were poor solutions. I eventually tripped across the LinkM, which is, on the surface, a USB controller/programmer for the BlinkM programmable LED devices. However, the BlinkM uses I2C as it’s communications bus and the LinkM is essentially a USB to I2C adapter. It’s pretty cheap ($30) and small, with a nice plastic housing and a simple female header connection. All the code is open source, from the client-side API to the firmware on the LinkM microcontroller. In addition, the client-side code is cross platform, in C, Java and Processing, working on Mac OS X, Windows, and Linux. Since the the USB interface is implemented as a simple HID device, it’s probably pretty easy to write code for any platform, really.

That said, while the software can talk to generic I2C devices, it’s really geared towards supporting the BlinkM. As such, there is little documentation about how to talk to generic I2C devices. The simplest thing to to is compile the linkm-tool application located in the c_host folder. Note that this depends on linkmbootloadlib, so you’ll need to build that first.

Windows notes:

  1. If compiling on a Windows platform, you’ll need MinGW – the LinkM developers recommend the TDM-GCC compiler suite, which integrates MinGW and GCC.
  2. In the Makefile for linkmbootloadlib, you’ll need to comment/remove line 98: rm -f lib$(PROGNAME).a # FIXME. You could replace it with the proper del command as well.

Once you have linkm-tool compiled you can do the following:

  1. Scan the I2C bus:
    linkm-tool -v --i2cscan
  2. Read/Write to an I2C device:
    linkm-tool -v --linkmcmd "0x01,<# bytes to write>,<# bytes to read>,<write byte 1>,<write byte 2>,...,<write byte n>"
    For example, if you need to write “0x50,0x11,0x20” (I2C address 0x50, command 0x11, data 0x20):
    linkm-tool -v --linkmcmd "0x01,3,0,0x50,0x11,0x20"
    Or to read 3 bytes: “0x50,0x12” (I2C address 0x50, command 0x12):
    linkm-tool -v --linkmcmd "0x01,2,3,0x50,0x12"

This is fine for simple testing, later when you put together an app, you can simply include hiddata.h and call the relevant functions.

{ 2 comments }

Cloning a MacBook’s HDD with BootCamp

I bought a nice Samsung 500GB SSD recently to replace the ol’ spinning disk that came with my 2010 15″ MacBook Pro (Snow Leopard). Pricing had finally come down to reasonable levels ($280) and this helps stave off my itch to upgrade (eyeing the 13″ Retina MBP).

Prior to the upgrade, I was running a triple-boot setup with Mac OS X, Ubuntu 12.04, and Windows 7 x64. I didn’t use the Ubuntu partition much, so I decided to dump it and fold the space into the Windows partition, with the intention of running Ubuntu in a VM (or just using Cygwin more).

My first problem came when I discovered that my utility for disk cloning, Acronis True Image, didn’t work on MacBooks due to the weird way Macs boot. I cloned the Mac OSX partition using a trial copy of Carbon Copy Cloner, with my new drive plugged into a SATA to USB/eSATA dock that I have. That left me with Mac OS X taking up the entire drive. I installed the SSD in my MacBook, following the instructions from iFixIt. I skipped the battery removal – it’s not really required and I don’t have the tri-wing driver needed to do so. Used pliers to get the screws off/on the side of the drive since I couldn’t find my Torx kit.

After booting into Mac OS X with my new drive, I used the Boot Camp Assistant to shrink the Mac OS partition down. At this point, I tried using Clonezilla to clone my old Windows partition over into the newly created Boot Camp partition, but I could not get it to boot, no matter what. I tried the Windows Startup Repair tools, various command line bcdedit things, etc., to no avail. I would always get “A disk read error occurred. Press Ctrl+Alt+Del to restart.” The partition was readable in Mac OS X, but it just wouldn’t boot.

I finally found this post over at Mark’s Machinations, who had similar issues when moving to a larger drive. I started where he says:

Now exit DiskUtil and fire up the BootCamp Assistant and create your BootCamp partition to whatever size you want.  Follow all of the instructions including inserting your Windows 7 installation disk and the click the “Install” button.

and continued from there. Reinstalled Windows. Cloned my old Windows partition on top (with the -m and -r flags and without the -j2 flag in Clonezilla, as stated in the instructions). Did the bdcedit bootrec dance to rebuild the BCD. After all that, all was well, and Windows 7 boots speedily!

I’m not entirely sure what the problem was – it might have been because I had GRUB installed previously. Or maybe it was an issue with the BCD store in Windows.

{ 2 comments }

Bacon Mac and Cheese

mac_and_cheeseMac and cheese is a classic comfort food and I love it during the winter. Creamy, with a crunchy breadcrumb topping and a nice crispy bottom/side crust of caramelized cheese. I typically hit it with some smoky bacon goodness, because, well, bacon. My general philosophy when it comes to mac and cheese and other comfort foods is that if you try to make them healthy, you’re basically removing the “comfort.” Eat smaller portions or less often, but don’t talk to me about non/low fat milk, cheese, etc. for this. Low-fat cheese, in particular, gets odd in melted applications. I like to serve this with a romaine salad for temperature and textural contrast, not to mention as a palate refresher.


Bacon Mac and Cheese

Developed by The RoboGourmet – v. 1.0, 1/18/2013
Adapted from The Martha Stewart Living Cookbook: The Original Classics, by way of Smitten Kitchen

Serves 4-8

Notes: This is a half-recipe because a whole pan is, well, a lot of mac and cheese. Don’t ask how many calories are in this. The smokiness of the bacon is lovely in this. If omitting the bacon (why?!?), replace the tablespoon of rendered bacon fat with a tablespoon of butter. Recommend freshly ground nutmeg and black pepper. Whole nutmeg and a Microplane Zester/Grater. Done. Same for the cheese – save yourself some money and buy your cheese in block form. Keep refrigerated right until you grate it for easy grating. A good box grater will make short work of this. I use the big holes.

Fundamentally, the cheese sauce in a traditional mac and cheese is a béchamel, a white sauce prepared by adding milk to a light-colored roux. A roux is simply flour cooked in a fat. When combining the milk with the roux it is critical that the milk be as hot as possible without burning and that it be added in increasing amounts to ensure a smooth sauce – in small amounts at first and then in larger amounts.

Serve with a crunchy green salad.

Pasta
1/2 pound (8oz) elbow macaroni

Topping
3 slices white bread
1 tablespoon unsalted butter

Cheese Sauce
3oz (2-3 slices) bacon
2-3/4 cups whole milk
2 tablespoons unsalted butter, plus a little more for the baking dish
1/4 cup all-purpose flour
1 teaspoon salt
1/8 teaspoon ground nutmeg
1/8 teaspoon ground black pepper
1/8 teaspoon cayenne pepper
9 oz sharp white cheddar cheese
4 oz Gruyère or 2.5 oz Pecorino Romano

Preheat oven to 375° F

Prepare the cheeses: Grate the cheeses and put in a large bowl. Toss to blend.

Cook the macaroni: Put 2 quarts of water in a pot and bring to a rolling boil. Salt the water so that it tastes like the sea – about 1 tablespoon. Add the macaroni and cook until the pasta is slightly undercooked, about 3-4 minutes. Transfer to a colander, rinse with cold water to stop further cooking, and then drain.

Prepare the topping: While waiting for the water to boil for the macaroni, trim and cut the bread into cubes. Melt 1 tablespoon of butter in the microwave in a medium bowl (1 minute on high). Put the bread cubes in the bowl and toss until evenly coated with butter.

Make the cheese sauce: Put the milk in a covered medium saucepan over medium heat and bring almost to a boil. In the meantime, cook the bacon in a large skillet over medium heat until crispy. Transfer the bacon to a paper towel lined plate to drain. Pour off all but 1 tablespoon of the rendered bacon fat.

Check the milk – it should be hot. If not, wait until it is nearly boiling. If boiling, turn down the heat to low so it does not burn.

Return the skillet to the stove over medium heat and add 2 tablespoons unsalted butter. When the butter fully melts and is bubbling, add the flour and whisk for 1 minute to create a roux.

Add the hot milk to the roux in increasing amounts while whisking constantly – first a tablespoon at a time, then a few tablespoons at a time, then 1/3 cup, etc. Each time you add milk, ensure it is fully whisked into the sauce so you don’t get lumps. Once you have added all the milk, continue to whisk until the sauce bubbles and becomes thick, about 8 minutes.

Turn off the heat and whisk in the salt, nutmeg, cayenne, and black pepper. Chop the bacon into bits and add to the sauce. Add about 3/4 of the grated cheese and stir until the cheese has melted (I recommend a spatula). Add the cooked macaroni and stir until the pasta is evenly coated.

Butter an 8” square baking pan (or other 1.5 quart baking dish) and transfer the macaroni mixture to the pan, using the spatula to smooth and work the mixture into the corners. Top with the remaining cheese and then the breadcrumbs.

Bake until golden brown, about 30 minutes (good time to prep a salad), then cool on a wire rack for 5 minutes. Serve.

Download PDF

{ 0 comments }

Les Misérables

Les Misérables is one of the greatest musicals of all time and I was really looking forward to the movie adaptation. While an OK movie, sadly, it falls far short of what it could have been, with significant flaws. Let’s start with casting – Russell Crowe was a bad choice for Javert. While Crowe doesn’t have a bad voice, it’s simply too angelic (“little boy” was what I called it walking out of the theater). Javert needs far more grit, more punch. Anne Hathaway delivered a good performance, but she did not fit my preconception of Fantine as a somewhat older woman. Hugh Jackson was pretty good as Jean Valjean and Samantha Barks, the West End veteran, was excellent as Eponine. I was initially delighted to see Sacha Baron Cohen and Helena Bonham Carter as the Thenardiers, but their performances seemed restrained from the heights of ridiculousness I know they are capable of and their performances lacked the joyfulness/silliness the parts are known for. Eddie Redmayne and Amanda Seyfried as Marius/Cosette were fine, but there was no chemistry there, but then, I’ve never seen a performance, either on stage or screen, where I’ve really connected with that romance – I just don’t buy the “love at first sight” bit. Colm Wilkinson, the original Jean Valjean, has a small part as the Bishop who initially sets Valjean on the road to self-reinvention.

Tom Hooper, noted for “The King’s Speech”, directs, and he makes a number of interesting decisions. The first is that all the singing is captured live – there is no lip-syncing. I’m of two minds about this. I think it’s a very bold move and certainly connects the viewer to the performance in an more visceral way. I always notice lip-syncing and it’s a bit distracting, though I typically forgive it when the recorded performance is good. However, this decision perhaps led to a decision to use very tight headshots for most, if not all, of the songs. I’m not saying the headshots are bad, but when you do it for all the songs it gets rather tiring being in everyone’s face all the time. Give me some variety – some sweeping shots – show me more of Paris. That and they had problems keeping the faces in focus. What I really, really, hate is the use of the handheld camera. I don’t know if it was necessary to maintain the closeups, but I detest the constant bobbing of the handheld camera – it makes me motion sick. I don’t know who decided the use of a unstabilized camera injects realism/grittiness into a film, but that person should be shot. The human visual system is excellent at tracking motion in reality and when a large portion of the field of view is bobbing up and down without the inner ear detecting anything, this disconnect just causes nausea. USE A STEADICAM.

Oh, and what’s with the tilted shots? What are we, teens from the 90s?

There are a few songs that I didn’t recognize, but it appears that’s because I’m used to listening to incomplete soundtracks.

The movie never really drew me in. I love the story and I teared up when Marius sings “Empty Chairs and Empty Tables” and more at the end scene where Valjean dies. But the overall movie lacked for passion, perhaps because the musical itself has some rough spots as well, which get magnified on the big screen. Still, I think that in better hands, this could have been glorious.

Fans of the musical will have to see it, and should, but first-timers should really plan to see a stage performance.

{ 0 comments }